Yoga is an amazing practice, from which not only your body but your whole being can benefit. However, we do admit that there are a lot of weird yoga poses out there.
Sometimes I look at a Yoga pose and wonder how on earth anyone can bend their body in such a way.
Often I look at a pose and just can’t believe that we humans are capable of doing these amazing movements.
I want to motivate you though, don’t be afraid to give these intimidating poses a try. You might need to practice a lot and you might tumble on your first try, but once you manage some of these strange and seemingly impossible poses, you will have this amazing feeling inside of you. The feeling of mastering something, conquering, and finding new places within you. Capabilities you doubted at first, and then suddenly have succeeded in doing.
Take a look at these weird yoga poses, try them, and once you master them, take a minute to appreciate just how amazing you were created. Just how wonderful and strong your body and mind really are.
12 Weird Looking Yoga Poses
Before trying any of these intermediate to advanced poses, please take a few minutes to warm up your body properly to avoid any injury.
Do not force yourself into any pose that your body might not be ready for yet. Listen to your body and if the pose is uncomfortable or even hurts you, back out of the pose immediately, try the simplification or preparatory poses first and come back to the pose some weeks later again.
Knee to Ear Pose

Knee to Ear Pose or Karnapidasana is a follow-up pose of plough pose.
It is also known as Ear Pressure Pose and is said to alleviate sinus symptoms. Other benefits of this funny-looking pose are full back stretch, improves flexibility of the neck, and it detoxes the organs.
How to do Knee to Ear Pose:
- From Plough Pose drop the knees to the floor if it is comfortable for you.
- Take 5-8 deep full breaths.
- To return to Savasana press the palms down into the mat, whilst lifting one leg after the other, draw the navel to the spine and slowly lower one vertebra at a time, then the bum, and lastly the legs back to the ground.
- Rest a few breath cycles in Savasana before going into the next pose.
Caution!
Do not practice this pose when you have one of the following:
- Hernia
- Slipped disk
- High blood pressure
- Sciatica
Super Soldier Pose
This playful weird-looking yoga pose is not really a traditional yoga pose, but rather a modern pose. It is given the name Viparita Parivrtta Surya Yantrasana and is a challenging balancing pose.
Other benefits alongside improving balance and stability are stretching the hamstrings and the side body.
Before you try this pose make sure to warm up efficiently with some rounds of Surya Namaskar.
How to do Super Soldier Pose:
- Begin in Lizard pose, with your right foot in front.
- Slide your right shoulder under your right knee.
- Gaze between your right foot and left hand, shift your balance, and step your left leg up whilst you gently begin to straighten your right leg.
- Grab your right ankle with your right hand and place your left hand outside of your mat in line with your right foot, for support.
- Shift your weight into your slightly bent right leg, lift your left leg and bend the left knee.
- Once you find balance lift your right hand and grab your left foot.
- Now lift your left knee up to the ceiling, whilst still holding your left foot, and straighten your right leg.
- Adjust your gaze, lengthen and open with your inhale.
- Stay here for 4-8 deep breaths.
- Slowly come back into lizard pose and take a rest in child’s pose.
Embryo Pose
Pindasana or Embryo pose is an advanced inversion as well as hip opener. It is a great pose to stretch out your neck, shoulders and legs and to improve balance and focus. Embryo pose also stimulates the kidneys and thyroid.
How to do Embryo Pose:
- Begin in shoulder stand with your hands supporting your back.
- Cross your legs into lotus.
- Inhale and on your exhale lower your knees towards your head.
- Carefully release your hands and wrap them around your legs to draw them closer to your body.
- Hold the pose for 5-8 deep full breaths.
- On an exhale return your hands to your back, gently lift your legs back up into shoulderstand and repeat with the other leg on top.
Caution!
Do not practice this pose when you suffer from one of the following:
- High Blood Pressure
- Knee Issues
- Back Injury
Happy Baby Pose

Happy Baby Pose or Ananda Balasana is one of my favorite hip openers.
Happy Baby Pose is a great asana to stretch the inner groin and back aswell as calming the brain, reducing stress, and relieving fatigue.
How to do Happy Baby Pose:
- Lie on your back and start by taking deep breaths.
- On an exhale bend your knees into your tummy.
- Take a deep inhale while grabbing the outsides of your feet with your hand. You can also use a strap to modify if you can’t reach your feet with your hands.
- Open your knees slightly wider than your torso and bring them up to your armpits.
- Make sure your ankles are directly above your knees so that your shins are perpendicular to the floor.
- Flex your feet and push them gently up into your hands or into the yoga strap, whilst pulling your hands down to create resistance.
- Hold this pose and take 5-8 deep breaths.
- Gently exit the pose and take some deep breaths in Savasana
Caution!
Do not practice this pose if:
- You are pregnant.
- Have a knee injury.
If you have a neck injury, practice this pose mindfully and maybe support your head with a blanket.
Destroyer of the universe pose
Bhairavasana is an advanced yoga pose and has side plank as its base pose. Therefore it is great to build core strength, balance, and focus. It also opens the hips.
How to do Destroyer of the Universe
- Start in Eka pada sirsasana with your right leg behind your head.
- Take a deep inhale and on your exhale twist to your left side and place the hands on your mat.
- Lift your hips up and slide your left leg away from your hands to come into side plank with your right leg still wrapped behind your head.
- Find balance and lift your right arm to the ceiling.
- Hold this pose for 3-5 breaths.
- Gently place your hips down and exit the pose.
Caution!
Do not practice when you have hip or knee injuries.
Flying crow pose

There are plenty of amazing benefits of the advanced hand balance pose, flying crow or Eka pada bakasana. These include strengthening of the core, arms, wrists, and shoulders. Opening the hips, and improving balance and focus.
How to do Flying Crow
- Start in Plank Pose
- Come into Downward facing dog and bend your elbows slightly.
- Bring your chest slightly forward and lift your right leg up, bend your knee and place your right knee just above your elbow.
- Shift your weight to the front, engage your core and try to lift your left leg off the ground.
- Gaze in front of you.
- Grip the mat even more with your hands, engage Mula bandha, and reach your left leg even higher to fly your crow.
- Hold for 3-5 deep breaths.
- Come back down slowly into downward-facing dog, take a couple of deep breaths and change sides.
Firefly pose

Tittibhasana or firefly pose is an advanced arm balance that relies on core strength as well as good hip flexibility. It strengthens the arms, wrists, shoulders, hip flexors, and core. Stretches your hamstrings, adductors, and outer hips aswell as improves balance, and relieves stress.
How to do Firefly Pose
- Start in Malasana Pose with your hands in Namaste Mudra.
- Place your hands on the mat and gently come into a half-forward fold with your feet wider than your hips.
- Inhale and on your exhale walk the hands to the back so that your fingertips are in line with your heals, keep a slight bend in your knees.
- Inhale and on your exhale sit your thighs onto your upper arms.
- Sink your bum down and grip your mat firmly with your hands.
- Gaze to the front, engage your core and Mula bandha to find stability.
- Lift your legs up off the ground and straighten them as much as possible.
- Hold for 3-5 deep breaths.
- To exit slowly place your feet back on the ground, inhale and on your exhale come into a forward fold.
Shoulder pressing pose

Bhujapidasana or Shoulder pressing pose is the easier beginner friendlier version of the firefly pose. It requires more technique than strength so if you can’t yet manage your firefly pose, try Shoulder pressing pose instead.
How to do shoulder pressing pose:
- Start in Malasana.
- Place your hands on the floor and walk them to the back in between and behind your feet.
- Wiggle your feet in front of your hands and your shoulders underneath your thighs and grip the mat firmly with your hands. Your fingers showing to the front.
- Let your bum sink deep and engage your core muscles, whilst straightening your arms.
- Cross your right ankle above your left ankle and try to lift them off the ground.
- Hold for 3-5 deep breaths.
- On your next exhale gently bend your elbows and slowly unwrap your ankles to lower them to the ground.
- Rest in Malasana.
Legs behind the head pose
Dwi pada sirsasana or both legs behind the head pose is a more advanced version of tortoise pose and is similar to the yogic sleep pose.
It has lots of benefits for the mind and body. It can help detox your body by increasing the blood flow. It aids with digestion. It increases your motivation and of course, is a great pose to improve flexibility.
How to do Legs behind the head pose
- Start in Staff Pose
- Bend your right knee, grab your ankle and bring it behind your back to rest it on your neck.
- Now do the same with the left leg.
- Find your balance, and place your hands in Namaste Mudra.
- Hold this pose for 3-5 breaths
- Gently ease out of the pose and rest in Savasana.
Yogic sleep
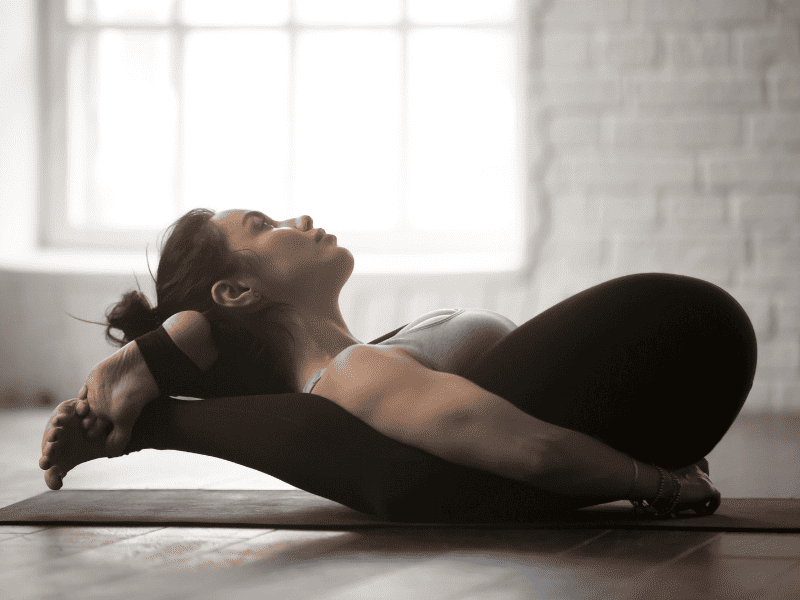
The very weird-looking Yogic sleep or Yoga Nidrasana is an advanced pose with lots of benefits.
Think of it as a hug that your limbs give your torso. A calming hug to calm you down yet also raise awareness. It is said that yogis that practice Yoganidrasna regularly experience the highest of bliss.
It is a forward fold and deep hamstring and lower back stretch.
How to do Yoganidrasana
- Begin in Savasana
- Bend both your knees and pull them into your body.
- Grab your feet and pull them back near the chest.
- Lift your shoulder and head off the ground and place your left leg behind your shoulder, so that your left calf touches your left shoulder blade.
- Do the same with your right leg.
- Now interlock your ankles and rest your head on them.
- Place your armpits on your thighs and fold your hands into a Namaste mudra.
- Remain in this pose for 3-5 deep breaths.
- Gently unlock the ankles slowly and relax in Savasana.
Some Benefits of Namaste Mudra:
- Stimulates the Anahata or Heart Chakra
- Calms the mind
- Relieves stress
- Improves Focus
- Promotes Inner Awareness
- Connects both brain hemispheres.
Caution!
Do not practice this pose if you have one of the following:
- High Blood Pressure
- Pregnancy
- Hernia
- Lower Back Injury
- Knee Injury
- Neck Injury
- Shoulder Injury
Do not force yourself into any poses!
Eight Angle Pose
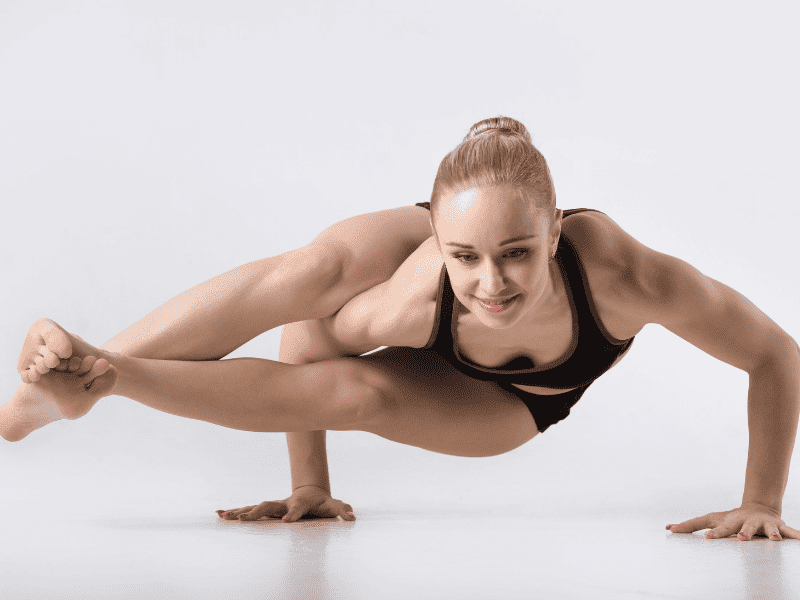
Eight angle pose or Astavakrasana is a great yet advanced yoga pose to improve your balance and flexibility. It can be a bit tricky to learn at first, but with a little practice, you’ll soon manage it. This pose is also great for improving your concentration and focus and helps to improve your circulation and digestion.
How to do Eight Angle Pose:
- Start in Staff Pose.
- Bend your right knee and bring your thigh out toward the right side.
- Bring your right knee behind and over your right shoulder.
- Stabilize yourself by pressing your right leg into your right arm.
- Tilt your upper body slightly forward to place your hands on the floor next to either side of your hips.
- Continue pressing your right inner thigh into your right shoulder whilst you press your hands into your mat, engage your core muscles and lift your hips and left leg off of the mat.
- Now hook your left ankle over your right ankle and press them firmly together.
- Bring your chest forward slightly and bend your elbows whilst pressing through your heels to straighten your legs as much as possible to the right side.
- Take 3-5 deep breaths.
- To exit the pose take a deep inhale, lift your chest and swing your legs back to the center of the mat, exhale and uncross your ankles to return to dandasana or staff pose.
Final Thoughts
Looking at these 12 weird yoga poses, you can see just how amazing they are and what wonderful benefits they can have on your body and mind.
Therefore I think they are absolutely worth trying. So don’t be afraid to try them. You may soon find that you enjoy some of these weird poses. Because really, the poses are only weird and strange because they are new to us. Once we get used to them, they won’t seem so strange anymore.
Have fun giving them a try and let me know how you felt during and after your yoga practice.
Namaste.