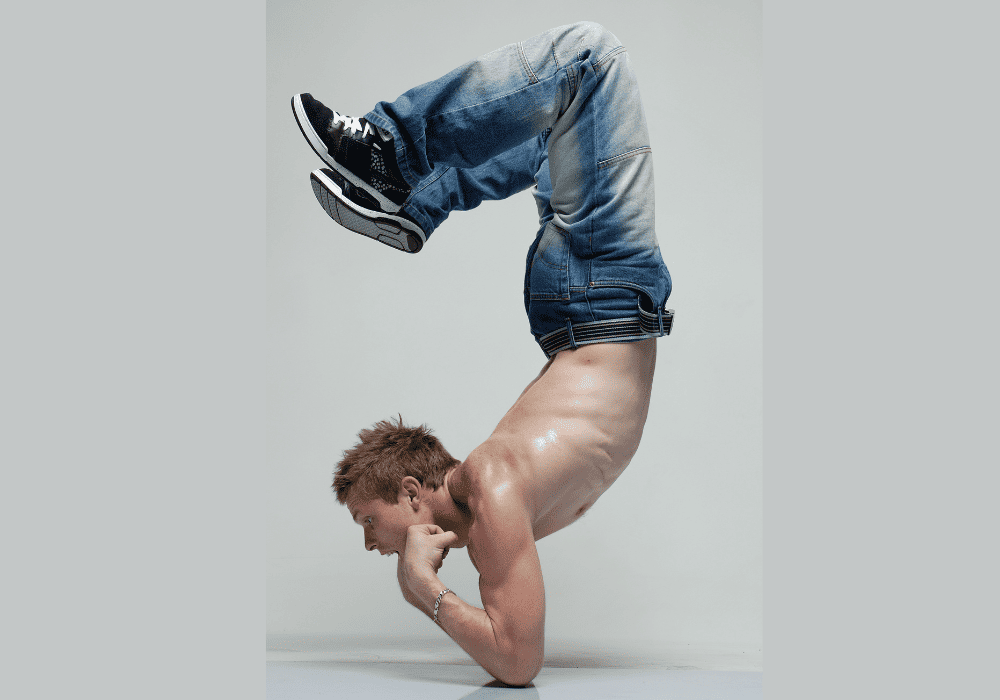
There are so many yoga poses out there. Each with different benefits and each of them comes with different challenges.
Hip openers require a lot of flexibility, arm balances need a lot of core strength and balance.
We all have different strengths and weaknesses, therefore it depends on what you consider to be difficult to do or not. Are you challenged more by balancing poses than strength or is it rather flexibility that you are still working on?
There are some yoga poses that are not called advanced poses for no reason.
Here are 10 of the hardest yoga poses that will definitely challenge you.
Eka Hasta Vrksasana

The Sanskrit word Eka Hasta Vrksasana can be translated to One Handed Tree pose. I think the pose name alone states the fact that this pose is an advanced one. An advanced inversion pose to be precise, that challenges even the most experienced yogis.
Ultimate balance and great strength are essential to master this tough yoga pose. It is included in the most advanced Ashtanga Vinyasa Series.
Physical Benefits of Eka Hasta Vrksasana
- Builds strength in the core, arms, wrists, and shoulders
- Increases energy
Other Benefits of Eka Hasta Vrksasana
- Calms the nervous system
- Teaches patience
- Boosts confidence
- Gives a different perspective
Caution!
Avoid this pose when you have or are one of the following:
- High Blood Pressure
- Heart disease
- Wrist or shoulder injury
How To Do Eka Hasta Vrksasana
This pose should only be attempted if you have already mastered the normal handstand or Adho Mukha Vrksasana.
- From handstand pose, slowly spread your legs to shift your weight slightly in order to stabilize yourself
- Slowly lift one hand off the mat and extend it toward the ceiling
- Breathe deeply and focus
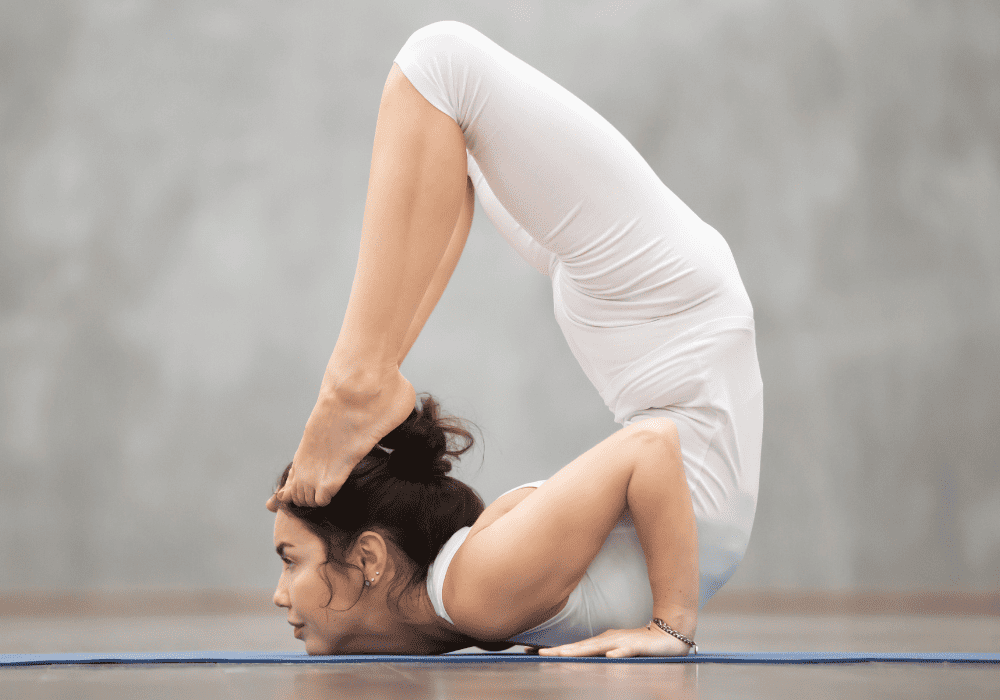
Taraksvasana

Taraksvasana or scorpion handstand is a combination of handstand and scorpion pose.
Scorpion Handstand is considered to be one of the hardest yoga poses because it requires you to have a great deal of strength, perfect balance, and good flexibility of the back.
Physical Benefits of Taraksvasana
- Strengthens arms, wrists, and shoulders
- Strengthens the core muscles
- Stretches the spine and front body
- Boosts circulation
- Opens the chest and improves respiration
- Stimulates the abdominal organs
- Improves balance
Other Benefits of Taraksvasana
- Activates the Solar Plexus -, and Heart Chakra
- Boosts concentration and focus
- Builds confidence
- Calms the mind
Caution!
Avoid this pose when you have or are one of the following:
- Pregnant
- High Blood Pressure
- Heart disease
- Wrist or shoulder injury
- Neck problems
How to do Taraksvasana
- If you are new to the pose you can use a wall as a prop.
- Start by standing in front of a wall, facing it
- Take a deep inhale and on your exhale come into downward-facing dog.
- From here kick yourself up into a handstand
- First, take a moment to focus on your stability in this pose.
- If you found your balance, either in a straight handstand or by using the wall to hold you, arch your back carefully and touch the wall with your toes
- Slowly move your feet as close as you can to your head.
- Breathing deeply and consciously is important in this pose to maintain your balance and focus.
Pungu Mayurasana

This advanced arm balancing yoga pose is translated to wounded peacock posture. For this pose, you need a lot of core strength and strong wrists, as the whole body will be floating horizontally on top of only one arm.
Physical Benefits of Pungu Mayurasana
- Strengthens your core
- Strengthens your wrists
- Strengthens back muscles
Other Benefits of Pungu Mayurasana
- Stimulates the Solar Plexus Chakra
- Boosts self-esteem
- Improves decisiveness
- Increases motivation
- Gives you a sense of purpose
- Boosts confidence
Caution!
Avoid this pose if you have or are one of the following:
- Wrist problems
- Pregnant
- If you had abdominal surgery recently
- High blood pressure
How to do Pungu Mayurasana
- Start in diamond pose
- Separate your knees slightly
- Place the right hand in between the knees, fingers pointing outwards.
- Place the left hand forward on the ground.
- Bend your right elbow and rotate it inside to place it near your belly button.
- Press your elbow against your stomach and straighten your knees.
- Point your toes backward and stretch your hand forwards.
- Keeping your body straight and tight try to shift your weight forward
- As you lean forward your feet will come up.
- Try to remain in the posture for as long as possible.
- Come back down, and relax in in childs pose for a few breaths and then try with the other hand.
Sayanasana
The Elbow stand pose or repose pose is an advanced inversion. The name might fool you into thinking that this pose is a resting pose, but really you need a lot of stability, core, and shoulder strength, and a lot of focus.
It can be found in the fourth series of ashtanga yoga.
Physical Benefits of Sayanasana
- Stretches the shoulders and armpits
- Strengthens the shoulders
- Strengthens the core muscles
- Improves balance and stability
Other Benefits of Sayanasana
- Increases ability to focus
Caution!
Avoid this pose if you have or are one of the following:
- Injury in the elbows
- Shoulder injury
- Pregnant
- High blood pressure
How to do Sayanasana
- Start in Downward facing dog
- Gently lower your elbows to come into dolphin pose
- Make sure that your shoulders are pushed away from your ears and engage your core
- Lift off into forearm balance
- Find your stability and shift your legs past your head
- Lift one hand from the ground and bring it to your chin
- If you found your stability bring your other hand to the chin
- Breath and try to relax in this difficult yoga pose
- Gently transition back.
Gandha Bherundasana
Gandha Bherundasana is one of the hardest yoga poses. It is an intense backbend that stretches the whole of the front body. It is only recommended to try after you have mastered some other intermediate backbends, like full wheel.
Gandha Bherundasana is translated into formidable face pose.
Physical Benefits of Gandha Bherundasana
- Stretches the whole front body
- Strengthens the back
Other Benefits of Gandha Bherundasana
- Calms the mind
- Reduces stress
- Activates the root-, sacral-, and throat chakra.
- Opens the heart chakra
Caution!
Avoid this pose when you have or are one of the following:
- Neck injuries
- Back injuries
- High blood pressure
- Pregnant
- If you have not warmed up properly
How to do Gandha Bherundasana
- Begin in tabletop
- Engage your core and keep your spine straight
- Lift your right leg straight back behind you
- Take a deep inhalation and on your exhale lower your upper body as you would in chaturanga.
- While drawing your shoulder blades together and maintaining length in your neck, lift your right leg higher to the sky with control, whilst kicking your left leg up gently to meet with your right.
- Take a couple of deep breaths while straightening your legs, activating your core and your Mula bandha
- With control bend your knees and back to come into the full pose.
- Take a couple of deep breaths before lifting your legs back up and slowly transition into plank pose.
- Rest in child’s pose.
Tittibhasana

The firefly pose or as it is called in Sanskrit, Tittibhasana also belongs to the hardest yoga poses, however, it seems much more intimidating than it actually is.
This arm balance pose needs less upper body strength and more core strength and openness.
Firefly pose is a great pose to teach you that practicing a pose regularly can bring results faster than you would imagine. It also is a great reminder to motivate us that even though we stumble at first, if we keep on showing up for ourselves (or the pose) we will eventually shine brighter and stronger than before.
Physical Benefits of Tittisbhasana
- Strengthens the wrists and arms
- Strengthens the core
- Stretches the hamstrings and inner groins
- Stretches the back body
- Improves balance
Other Benefits of Tittibhasana
- Encourages playfulness
- Increases courage
- Improves confidence
Caution!
Always warm up before going into a challenging pose. Avoid this pose if you have wrist problems.
How to do Tittibhasana
- Begin in Tadasana.
- Take a deep inhale and reach your arms over your head.
- On your exhale come into a forward fold.
- From here place your feet a little wider than hip distance apart.
- Place your hands behind your ankles with your fingertips touching your ankles.
- Wiggle your torso behind your legs and snuggle your shoulders behind your knees.
- Spread your fingers wide and take a deep bend into your knees, and sink down your hips to come to sit on your upper arms.
- On your next inhale begin to extend the legs as much as you can, either both at the same time or one after the other.
- Straighten your arms as much as you can.
- Spread your toes and enjoy the flight 😉
- Carefully release your feet back down to the ground and rest in Malasana.
Hanumanasana

Ah Hanumanasana. I love the English translation for it, Monkey pose. It is also known as front splits.
A lot or most yogis want to master this challenging stretch. Like we want to master the handstand, we also dream of mastering Hanumanasana.
For most of us, it does not come easy though, but please do not give up. Progression takes time, especially for this pose.
Physical Benefits of Hamumanasana
- Stretches your entire lower body, especially the thighs, groins, and hamstrings
- Engages the core
- Stimulates your abdominal organs
Other Benefits of Hanumanasana
- Improves perseverance
Caution!
Be very careful not to overdo it in this stretch. Listen to your body and warm up properly to prevent injury. If you go beyond your limits in this pose you could risk pulling a muscle and this is an injury that takes a long time to heal again.
How to do Hanumanasana
- Begin in Downward Facing Dog
- Inhale and lift your right leg up to the ceiling to come into one-legged downdog.
- Exhale and bring your right knee to your nose and slowly drop your foot between your hands.
- Drop your left knee onto the mat.
- From here first come into half splits, inhale straighten your back over your right leg and exhale to pull your torso towards the ground, leading with your heart.
- Inhale back to center.
- Wiggle your right foot towards the front and your left foot towards the back, trying to keep your hips square.
- Depending on your flexibility you can use blocks to prop yourself up.
- Just go as far as possible, breathing deeply into the stretch. With each exhale try to let go of the tension a bit more.
- Try to pull both legs towards each other rather than just pushing down into the stretch.
- Once you reach your limit try to hold this pose for 8 deep breath cycles.
- Gently come out of the pose by pulling both legs together and propping yourself up on your blocks.
- Return to tabletop position and rest in childs pose before you try on the other side.
Remember one side is usually much better (more flexible or stronger) than the other side.
Eka Pada Rajakapotasana
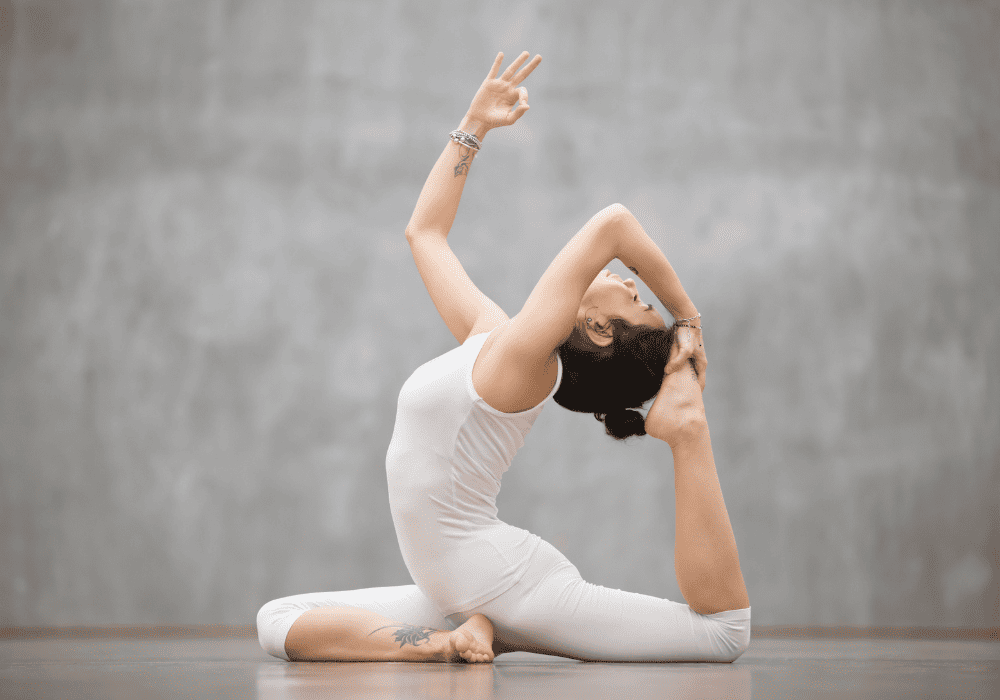
This beautiful pose is translated into one-legged king pigeon pose. It is a challenging seated back bend pose. This pose stands for flexibility and grace.
Physical Benefits of Eka Pada Rajakapotasana
- Stretches the full front body
- Improves hip flexibility
- Improves the flexibility of the quadriceps
- Improves back flexibility
- Engages the core
- Improves neck and shoulder flexibility
- Stimulates the internal organs
Other Benefits of Eka Pada Rajakapotasana
- Relieves anxiety
- Relieves stress
- Energizes the sacral chakra
Caution!
Avoid this pose if you have or are one of the following:
- If you had a hip replacement recently
- If you have hip knee or ankle injuries
How to do Eka Pada Rajakapotasana
- Come into the simple version of pigeon pose with your right leg forward
- Place your hands next to your hips
- Inhale and press into your front shin and back foot whilst you lengthen your spine and lift your chest
- Exhale as you prepare to grab your back foot with your hands
- Inhale and bend your back knee and grab the inner arch with your right hand.
- Bend your elbow and rotate it to the ceiling
- Now reach your left-hand overhead to grab your right foot whilst bending the elbow to the ceiling. Try to touch your foot with your head.
- Take 8 deep breaths in one-legged king pigeon pose.
- Slowly change sides and repeat.
Svarga Dvijasana

This pose resembles a tropical flower and therefore is named after it. The bird of paradise.
It is a great asana to practice balance and patience. This beautiful pose can only be attained when you are patient enough and determined enough to find balance whilst engaging your core and concentrating on stretching the leg.
Physical Benefits of Svarga Dvijasana
- Improves balance
- Improves flexibility of the hips and groins
- Improves the flexibility of the hamstrings
- Strengthens the core
Other Benefits of Svarga Dvijasana
- Balances the Muladhara chakra
- Balances the Svadisthana chakra
- Teaches patience
- Improves mental strength
- Improves resilience
Caution!
Avoid this pose if you have or are one of the following:
- Pregnant
- High blood pressure
- Injured at the hip, back, or shoulders.
How to do Svarga Dvijasana
- Start in warrior 2 pose with your right leg at the front of your mat
- Take an inhale and on your exhale come into side angle pose
- Now bind your arms, by moving your right arm under your right leg to your back and reaching your left hand to the back to grab the right hand.
- Inhale and gaze at your front toes
- Exhale and slowly and with control step your left leg next to your right leg
- Engage your core and lift your front leg with the bind and come into standing
- Inhale and on your exhale try to straighten your right leg to come into your full and final posture.
- Take 8 deep breaths. And slowly return to warrior 2.
- Change sides and repeat.
Urdhva Prasarita Eka Padasana

Standing split pose or Urdhva Prasarita Eka Padasana is a challenging inversion that does not only challenge your flexibility but also your balance, core strength, and back and leg strength.
Physical Benefits of Urdhva Prasarita Eka Padasana
- Stretches the legs
- Strengthens the core
- Strengthens the legs and back
- Improves balance
Other Benefits of Urdhva Prasarita Eka Padasana
- Calms the mind
- Improves concentration
- Improves coordination
- Activates the Muladhara chakra
- Activates the Svadhisthana chakra
- Energizes the Sahasrara chakra
- Relieves headaches
- Relieves anxiety
Caution!
Avoid this pose if you have or are one of the following:
- Migraine
- Low blood pressure
- High blood pressure
- Hip injury
- Ankle injury
- Knee injury
- Shoulder injury
How to do Urdhva Prasarita Eka Padasana
- Begin in Tadasana
- Inhale and reach both arms overhead
- On an exhale come into a forward fold
- Bring both hands to the floor and transfer your weight equally into your right foot and both hands
- Lift your left leg. First only to hip height.
- Then kick back through your left leg, straighten your spine. Square your hips and bring your leg as high as possible.
- You can either grab your right foot with both hands and fold over your right leg. This challenges your balance a lot more.
- Or you can bring your hands to the outside of the mat to fold deeper and have better stability.
- Stay in your standing split for 8 deep breaths and lower into forward fold with control.
- Repeat on the other side.
Final Thoughts
There are so many yoga poses and with certainty, I have not nearly named all of the hardest yoga poses. These 10 poses that I have mentioned are all advanced poses that do not only challenge our physical body, but also our mind, and really that is what yoga is all about. To keep softness during a physically challenging phase. Breathe and try to soften into the pose. To still your mind when your body is at its limit.
Our body is made to endure a lot of difficulty and challenging postures that need a great deal of strength. It is our minds that we have to convince.
Before you try any of these poses, please warm up correctly and never force yourself into a pose. Do try and come back another day, if you do not succeed at first. Your body will eventually get the hang of it.
Gladly, let me know which yoga poses challenges you the most and why.
Namaste.
FAQ’s
What is the ultimate yoga pose?
There are a lot of challenging yoga poses out there. Which yoga pose is considered the hardest depends on the person asking. Are you more challenged by poses that require a lot of strength, balance, or flexibility?
All of us are different and therefore this answer will be different for each of us.
If I would have to answer this one though, the advanced yoga pose Taraksvasana or handstand scorpion is a really difficult pose to master.
This pose requires a lot of physical and mental strength, flexibility, and balance, and therefore will challenge every yogi.
Which yoga pose challenges balance the most?
Arm balances are often considered challenging poses when it comes to balance. This is because our body is not used to being up-side-down.
Handstand is an advanced yoga pose that does not only need you to have good balance but also strength and trust in yourself.
Is side crow harder than crow pose?
A lot of yogis find that side crow is easier to do than crow pose. This could be that the balance and center of gravity are more to one side and that it does not feel that scary when falling, as you would tend to fall to one side rather than to the front like you would in crow pose.